
Description
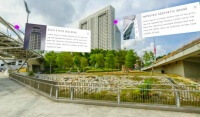
Add to wishlistFirst you are placed in the middle of the view, a 360 photo sphere image, looking like you are right there.
There are pointers on the selected element, that once you tap will display info windows, text and images.
Is a start, we want to give you a boost with your next VR app. Of course there are plenty of things that can be added, like geolocation, maps, distances, navigation, user comments and ratings, everything you can imagine. But anytime you can request a quotation and we will get back as soon as possible.
Features
First of all, install Unity 3D on your computer.
Extract the downloaded package and open the project in Unity.
Next thing to do is to navigate in your browser to:
https://developer.oculus.com/osig/
and complete the registration in order to get your osig (Oculus Signature) file. This way you will be able to test the apps on your device while you develop.
Download your signature file and place it in Assets/Plugins/Android/Assets folder.
You should have Oculus services installed in your phone (comes with Oculus Store, get installed first time you plug in your Samsung Gear). To enable developer mode on your phone:
- Go to Settings > Application Manager
- Select Gear VR Service
- Select Manage Storage
- Click on VR Service Version several times until the Developer Mode toggle shows up
- Toggle Developer Mode
Now you are ready to test the app on your device. In unity click CMD+B / CTRL+B to build directly on your phone.
Reskin
You can change the main 360 image, the pointers and info boxes details.
1. Change the main 360 image.
You can find this type of image here: https://plus.google.com/communities/115970110085205516914. Or google ‘photo sphere images’. If you don’t want to use a ready made image, you can create your own, there are Android and iOS apps to create awesome 360 images.
Once you have selected the image, open the scene in Unity, drag your image in the assets area, change Texture Shape from Inspector panel to Cubr type and Mapping to Latitude-Longitude Layout. Wrap Mode should be Clamp.
Next, create a new material in your assets and choose Skybox/Cubemap for the Shader type.
Now drag the image you imported earlier to the Cubemap image box.
Open Window – Lightning from the top menu and drag the Skybox material you have just created in the Skybox field.
Everything should be fine now, you can already see your 360 image looking nice when previewing the app.
2. Add pointers
Following the model, the simple way to do this is to go to the Scene view, duplicate the Trigger1 and panel1, rename as you wish (Trigger9 and Panel9 for this example). Now to be easier to preview the trigger and panel on top of the 360 skybox image, switch to the Game preview mode, select Main Camera from the Hierarchy panel, and play with the rotate Y and X to find the area you want to display your trigger and panel. Do the same with Trigger9 and Panel9, use Position and Rotation in your Inspector panel to move them.
To change the Panel image, use Photoshop (PSD file included) and modify the image and text with your own details. Now back in Unity, drag the new image (Panel9.png) in the assets area. Create a new material in assets called Panel9, choose Unlit/Texture for the Shader type and drag the Panel9.png image in the Base(RGB) box. Now drag this new material on top of Panel9 element in your Hierarchy. Everything should be fine now.
To create the open/close functionality for your new panel, open the Scripts script file and find this piece of code:
if (hit.collider.gameObject.name == “Trigger4”) {
GameObject.Find (“Panel4”).transform.localScale = new Vector3(50, 20, 10);
}
if (hit.collider.gameObject.name == “Panel4”) {
GameObject.Find (“Panel4”).transform.localScale = new Vector3(0, 0, 0);
}
Duplicate this and adapt it for your new panel, replace 4 with 9 and you are good to go.
Add a new line inside void Start() function, following the patern, you should have:
…
GameObject.Find (“Panel4”).transform.localScale = new Vector3(0, 0, 0);
…
– add here this line for your new panel:
GameObject.Find (“Panel9”).transform.localScale = new Vector3(0, 0, 0);
Now your app should work fine.
